Play! scala-activerecord
この記事は、Play or Scala Advent Calendar 2012の22日目の記事です。
ここではscala-activerecordのPlay2での利用について紹介したいと思います。
scala-activerecordは、ASE社のa_onoさんらが開発したScala用・国産ORMです。
scala-activerecordは以下の三つの大きな特徴を持っています。
- Ruby on Rails の ActiveRecord のようなインターフェース
- XMLレスな O/R マッピング
- DB接続に関するコードがほぼ不要
私は、Anormとの比較しかできませんが、Anormと比べて(比べるな?)、涙が出るほど使いやすいです。実際に、今年のAward向けに開発した、はてブちうで使わせてもらいました。
Play用のサンプルもgithub上にありますが、解説はほとんどないので、Playで利用するための初歩的な解説+αをお届けしたいと思います。
※ ここで紹介したソースはGithubにアップしてあります。
準備
何はともあれ、DBコネクションの設定を有効にしておきましょう。 cond/application.conf の db.default.xx のコメントアウトをはずします。
(略)

# Database configuration
# ~~~~~
# You can declare as many datasources as you want.
# By convention, the default datasource is named `default`
#

db.default.driver=org.h2.Driver
db.default.url="jdbc:h2:mem:play"
db.default.user=sa
# db.default.password=

(略)
次に依存性解決です。 project/Build.scala を以下のようにいじります。
import sbt._
import Keys._
import PlayProject._

object ApplicationBuild extends Build {

    val appName         = "scalaActiveRecordSample"
    val appVersion      = "1.0-SNAPSHOT"

    val appDependencies = Seq(
      // Add your project dependencies here,
      "com.github.aselab" % "scala-activerecord" % "0.1"
    )

    val main = PlayProject(appName, appVersion, appDependencies, mainLang = SCALA).settings(
      // Add your own project settings here
      resolvers ++= List(
        "aselab repo" at "http://aselab.github.com/maven/"
      )
    )

}
次に、Table情報を定義するクラスを用意します。
app/models/Tables.scala を作成して、以下のようにしてください。
package models

import com.github.aselab.activerecord._
import com.github.aselab.activerecord.dsl._

import com.typesafe.config._
import play.api.Play.current

object Tables extends ActiveRecordTables {
  //Define Table here.
  //ex.
  //val users = table[User]("User")


  lazy val playConfig = current.configuration

  override def loadConfig(config: Map[String, Any]): ActiveRecordConfig =
    PlayConfig(playConfig.underlying, config, "default")

  case class PlayConfig(
    config: Config = ConfigFactory.load(),
    overrideSettings: Map[String, Any] = Map(),
    dbMode: String = "default"
  ) extends AbstractDefaultConfig(config, overrideSettings) {
    override val env = if (play.api.Play.isProd) "prod" else "dev"

    override def get[T](key: String, getter: String => T): Option[T] = try {
      Option(getter("%s.%s.%s".format(env, dbMode, key)))
    } catch {
      case e: ConfigException.Missing => None
    }

    override def connection = play.api.db.DB.getConnection(dbMode)
  }
}
モデル/テーブルを追加したら「Define Table here」とコメントがあるところに追加していきます。
このTableクラスのinitializeメソッドを読んであげる必要があります。 app/Global.scala を用意しましょう。
import play.api._
import com.github.aselab.activerecord._
import models._

object Global extends GlobalSettings {
	override def onStart(app: Application) {
		Tables.initialize
	}

	override def onStop(app: Application) {
		Tables.cleanup
	}
}
これで準備完了。
Userテーブル/モデルの作成
Userテーブルを作ります。
まずは、evolutionsの定義。conf/evolutions/default/1.sql を作ります。
# Tasks schema

# --- !Ups
create table users (
  name varchar(128) not null,
  age int,
  createdat date,
  id bigint not null primary key auto_increment
);

# --- !Downs
drop table users;
次にmodelsの定義。app/models/User.scala を作ります。
package models

import com.github.aselab.activerecord._
import java.sql.Timestamp


case class User(
  var name: String,
  var age: Int,
  var createdat:Timestamp
) extends ActiveRecord{
	def this() = this("", 0, null)
}

object User extends ActiveRecordCompanion[User]
scala-activerecordで秒まで扱うためには、java.util.Date ではなく java.sql.Timestamp を使わないといけないのでご注意。scala-activerecordがベースにしているSqueryの仕様です。
app/models/Tables.scala に定義を追加することもお忘れなく。
(略)

object Tables extends ActiveRecordTables {
  //Define Table here.
  //ex.
  val users = table[User]("User")

(略)
さて、app/Global.scala にデータを仕込む実装を追加しましょう。
import play.api._
import com.github.aselab.activerecord._
import models._
import java.sql.Timestamp

object Global extends GlobalSettings {
  override def onStart(app: Application) {
    Tables.initialize

    if(User.all.toList.length == 0){
      User("Taro Yamada", 16, new Timestamp(System.currentTimeMillis())).save
      User("Jiro Suzuki", 19, new Timestamp(System.currentTimeMillis())).save
      User("Saburo Satoh", 20, new Timestamp(System.currentTimeMillis())).save
      User("Shiro Yoshida", 23, new Timestamp(System.currentTimeMillis())).save
      User("Goro Gotoh", 29, new Timestamp(System.currentTimeMillis())).save
      User("Rokuro Muguruma", 35, new Timestamp(System.currentTimeMillis())).save
      User("ShichiRo Nanasawa", 46, new Timestamp(System.currentTimeMillis())).save
    }
  }

  override def onStop(app: Application) {
    Tables.cleanup
  }
}
さて、app/controllers/Application.scala ユーザの一覧を取得する処理を実装してみます。
package controllers

import play.api._
import play.api.mvc._
import models._
import java.sql.Timestamp

object Application extends Controller {

  def index = Action {
    val users = User.all.toList
    Ok(views.html.index(users))
  }
}
画面側も作ります。app/views/index.scala.html
@(users:List[models.User])

@main("Sample scala-activerecord") {

    <ul>
    @for(user <- users){
    	<li>@user.name ( @user.age )</li>
    }
    </ul>

}
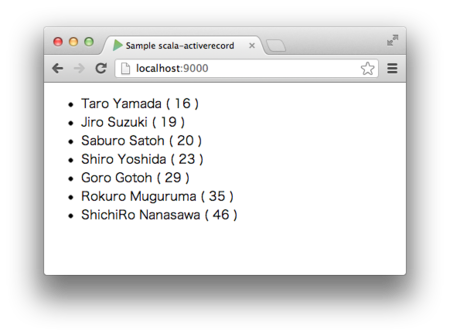
それでは動かしてみましょう。

DBへのINSERTと、SELECTが確認できたと思います。
条件抽出
名前をLIKE検索する処理を追加してみましょう。
app/controllers/Application.scala に以下のfindメソッドを追加します。
  def find(name:String) = Action {
  	val users = User.where( u =>
  		u.name like name + "%"
  	).orderBy(u => u.age desc).toList
  	Ok(views.html.index(users))
  }
また、年齢でフィルターする処理も追加しましょう。
app/controllers/Application.scala に以下のfilterメソッドを追加します。
  def filter(age:Int) = Action {
  	val users = User.where( u =>
  		u.age.~ < age
  	).orderBy(u => u.age desc).toList
  	Ok(views.html.index(users))
  }
この際、com.github.aselab.activerecord.dsl._ をインポートするのを忘れないようにしましょう。
上記のfilterメソッド内で使われている、「u.age.~」の「~」ですが、その後に続く「 < 」が元々存在する演算子でこれをSQL的な演算子として扱うために、「u.age」を明示的にSQL用の「<」メソッドを持つ型に変換させるためのメソッドです。Squeryで用意されているものです。
尚、SQLのDSLは SQL Functions - Squeryl - A Scala ORM for SQL Databases を参照してください。
app/controllers/Application.scala は以下のようになりました。
package controllers

import play.api._
import play.api.mvc._
import models._
import com.github.aselab.activerecord.dsl._

object Application extends Controller {

  def index = Action {
  	val users = User.all.toList
    Ok(views.html.index(users))
  }

  def find(name:String) = Action {
  	val users = User.where( u =>
  		u.name like name + "%"
  	).orderBy(u => u.age desc).toList
  	Ok(views.html.index(users))
  }

  def filter(age:Int) = Action {
  	val users = User.where( u =>
  		u.age.~ < age
  	).orderBy(u => u.age desc).toList
  	Ok(views.html.index(users))
  }

}
conf/routes にルートの追加が必要です。
# Routes
# This file defines all application routes (Higher priority routes first)
# ~~~~

# Home page
GET  /         controllers.Application.index
GET  /find   controllers.Application.find(name:String)
GET  /filter  controllers.Application.filter(age:Int)

# Map static resources from the /public folder to the /assets URL path
GET     /assets/*file               controllers.Assets.at(path="/public", file)
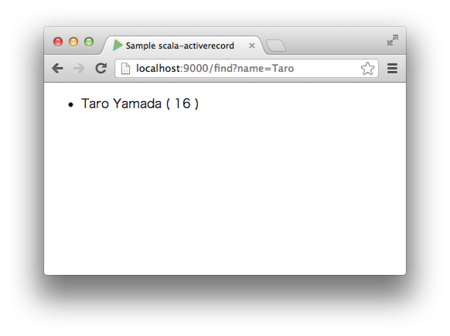
/find を呼んでみましょう。

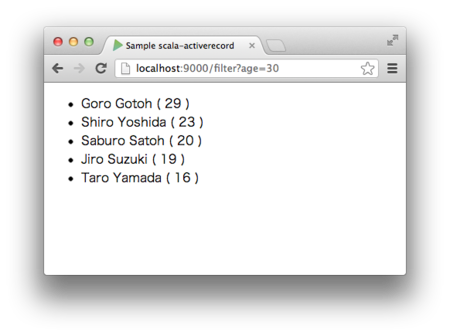
次に /filter です。

ご参考:明示的にトランザクションを区切る
JOB的に大量レコードのINSERTが必要な場合には、以下のようにすると明示的にトランザクションを区切れます。
transaction{
    new User(...).save
}
注意:model修正後にはPlayのリロードが必要
です。0.2-SNAPSHOTで直っているかも?しれません。